What Settings Do You Need?
When dentists first pick up a DSLR for dental photography, they are often intimidated by the camera and terminology, as they can be a bit confusing, and they worry that they will really have to understand photographic fundamentals to take good pictures. Fortunately, nothing could be further from the truth, and with a few settings, the big, fancy-looking camera essentially becomes a big point-and-shoot camera that’s easy to use.
Manual or Automatic?
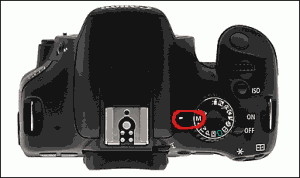
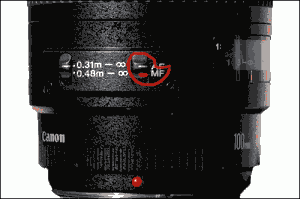
The first thing you MUST do for your peace of mind, is to make sure that BOTH the camera and the lens are set to MANUAL mode, not automatic. On a Canon T2i with a 100mm macro lens, here are photos to demonstrate. For the top dial, the M should line up with the white line. On the lens, that white line should be where the red one is to line up with the MF.
Why should they be on manual, not automatic? Because of the focus: if you’re on automatic, every time you press the trigger 1/2 way down, regardless of how close or far you are from the patient, it will focus there, and every single one of your pictures will be of a differently sized area. If everything is on manual, you can control exactly how much of the patient’s smile, arch, etc you want to include, and they will be consistent.
Shutter Speed, Aperture (f-stop), and ISO
As I discussed in my blog post from ’09 Keep It Simple, Right?, the most important settings for taking consistently good intra-oral and extra-oral photos are easy and require only 1 change to switch from a full-face portrait to what’s needed for a full smile, retracted smile, full arch, quadrant, or even single-tooth pictures. So please forgive me if I blatantly plagiarize myself here 😉 :
![]() WHITE BALANCE: IF you don’t know how to create a Custom White Balance, then I recommend your WB setting should always be on “Daylight“, as seen in this image. However, creating a Custom WB is most ideal.
WHITE BALANCE: IF you don’t know how to create a Custom White Balance, then I recommend your WB setting should always be on “Daylight“, as seen in this image. However, creating a Custom WB is most ideal.
FULL FACE:
- ISO 200
- Shutter speed 1/200
- f-stop f/8.0
EVERYTHING ELSE:
- ISO 200
- Shutter speed 1/200
- f-stop f/25
RAW, JPEG, or Both
In a post a long time ago, I recommended using JPEG files as the default for most dentists, unless you are aiming for Accreditation or Fellowship with an organization like the AACD, as they require you to use RAW images. That way, they know they are looking at unedited images with no photoshopping of any kind.
However, in the last few months, I’ve begun re-thinking this stance for dentists in general – including myself. Why? For the following reasons:
- Big memory cards, i.e. 8GB, 16GB, etc. are now very inexpensive
- Big hard drives, both internal and external, are now very fast and inexpensive
- Computer processors are now very fast and can handle large files much more easily
- Photography software now mostly uses image previews, or the equivalent of thumbnails, when you are viewing large numbers of pictures, instead of the full image, to avoid bogging down the computer, and
- Most photography software now allows easy viewing of RAW files, just as with JPEGs.
So recently, I have decided to change my camera settings to shoot both RAW and JPEG files simultaneously. That way, I have an original image forever with the maximum possible data captured via the RAW file, and there is the JPEG, which is more easily used for your staff if they are including them as insurance attachments, or if you want to import those into your choice of Practice Management Software.
Important Point: Use the SMALLEST RAW file size available and either the Medium or Small JPEG. As long as you have a RAW file from any current DSLR, it will be more than you need for a permanent record, and even that will likely be 5MB each, so if (for some reason) the Small JPEG file were inadequate, you can create a TIFF, PSD, JPEG, or almost any other file format from the RAW image.
(more coming soon)

