Regardless of what software you use (assuming you are not using your practice management software, which would make this a lot more difficult), at some point you want to share your pictures online or in photobooks, maybe the iPad app DDS GP, or something else. When doing so, a standard “post-process” workflow is key, including how you name, size, and organize the pictures.
Guidelines on Naming and Resizing Your Pictures
When first importing photos into Lightroom, don’t worry about renaming them, as that is usually an unnecessary, extra step. An exception would be if you want the patient name attached to each. However, when you’re exporting a number of pictures to use for the web, you’ll want to rename them to something that will help them be found by Google, and you’ll want to keep them to a minimum size.
There are some important keys to remember when using photos online in particular:
- Picture resolution should be either 72 or 96 ppi (pixels per inch)
- Image size should be no more than about 500 pixels on the long edge
- Image color space should always be sRGB, since most web browsers do not offer color space management (a rather technical topic, to say the least!)
- Image file size should be 50kb or less
- The image file name should be short and include keywords that identify what is in the picture
- The image file name should not include spaces, start with numbers or other characters, and use either “-” (hyphen) or “_” (underscore) in place of spaces.
Some examples of file names would then be along these lines:
- charlotte_porcelain_veneers
- chicago-same-day-crown
- cosmetic_dentist_makeover
- teeth-whitening-before-after
First Use Lightroom Collections
I’ve already discussed how I set up an easy-to-use folder structure for your overall library, but when you want to take certain sets of pictures to use for specific purposes, you don’t want to have to find them every time.
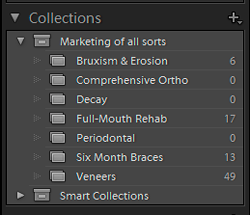
 Lightroom has an easy way to create “Collections” of photographs; the “Smart Collections” also works well but is a little trickier, so unless you’re an advanced user, just stick with regular Collections.
Found on the left side of the screen in the Library Module, use the little (+) button to create a new Collection. I’m in the process of reworking mine, so you don’t see much at the moment. 😉 The Collections you create will obviously reflect the material you want to share, whatever the format.
Once your Collections are created, all you have to do is Select the photos you want, then Drag them to desired Collection and let go of the mouse. EASY!
Export the Collections to Identically-Named Folders and “Add to the Catalog”
(this material to be added soon)